Felixstowe Area “N” Gauge Group
JULY 2020 NEWSLETTER
MEMBER’S ROUNDUP
Exhibitions & clubroom by Trevor
Another month has passed and this has brought more news that we won’t be able to attend any model railway shows / events for some time to come. A trawl around local club sites has shown the following cancellations;
IRMA Open day September
Exhibitions at; Bressingham, Bury St Edmunds, Chelmsford, Colchester, Mid Essex, Royston, Spalding, Sudbury and Warley.
I don’t think this will surprise anyone as the level of uncertainty is very high, especially the risk of further lockdowns in the autumn period.
On a brighter note once we are up and running again there should be plenty of new exhibits to see.
We have been taking about the clubroom and whether it is possible to hold any group meetings. At the moment we don’t really think this is possible as the space is rather small and impossible to keep sufficient social distancing with more than 4-5 members present.
However, we do have members with a number of projects based in the clubrooms, and since travel restrictions were relaxed we have allowed some limited access for work on these.
This needs to be managed with fixed time slots to minimise contact.
MEMBER’S LAYOUTS by Alan
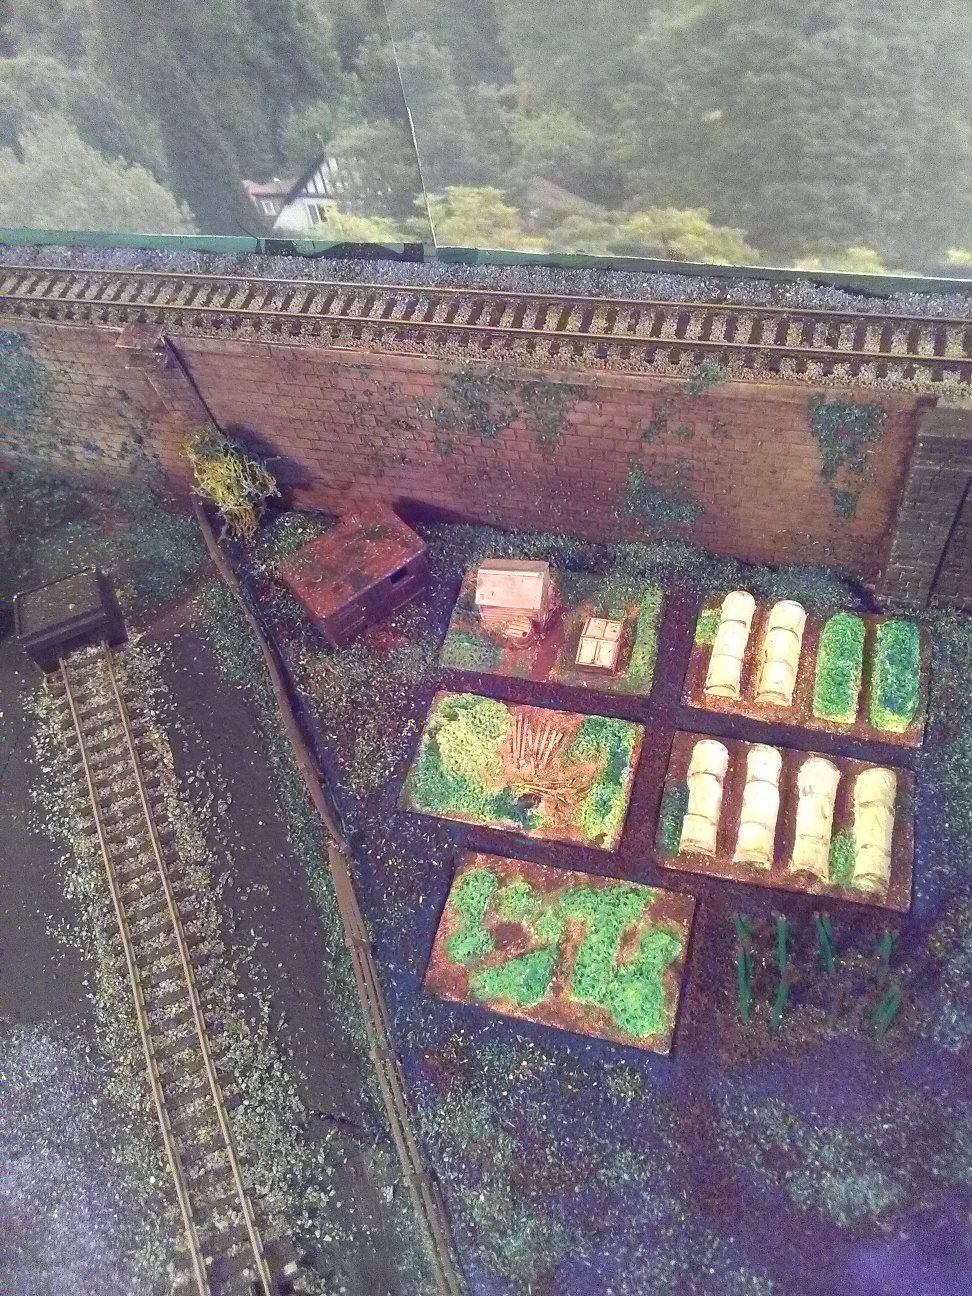
The photo shows one of my wife's contributions; she's a very keen gardener and this is her allotment.
NEW MEMBER by Iain
Hello and let me thank you for allowing me join the Group Actually I am no stranger to the Felixstowe Group.
You might not recognise my name but I'm sure my face will be familiar as I have exhibited at your annual exhibitions, either with my own micro layout “City Road” or as part of the Ipswich Railway Modellers team over a fair number of years, plus visits to your Open Days.
However, you will not see a lot of me as I live at Sudbury and it is the best part of a 90 mile round trip.
I used to belong to Suffolk & North Essex, but upon its demise, taking into account my affiliations with Felixstowe, I decided to move over.
I have been modelling in “N” for over 30 years with varying degrees of success.
I am also a long time member of the Ipswich Railway Modellers' Association, helping in the construction of the three current layouts, “Clintons Bend”, Winsford Hill” and “Ipswich South Bank”.
At the moment I am engaged in the building of my fourth layout, “The Assington Branch”.
This has nothing to do with the Assington near the Suffolk/Essex border, I just liked the name.
If there are at least three Sudburys in UK and others in USA, Canada & Australia, why shouldn’t I have an Assington set in southern England?
Basically it is the terminus of a single track railway off the old LSWR main line linking three small market towns one of which has a weavers that generates a fair amount of trade plus all the town send out agricultural products.
At the time in which the layout is set, there is a growing commuter traffic to the nearest city and up to London. Expansion is due for the area, so the future looks bright.
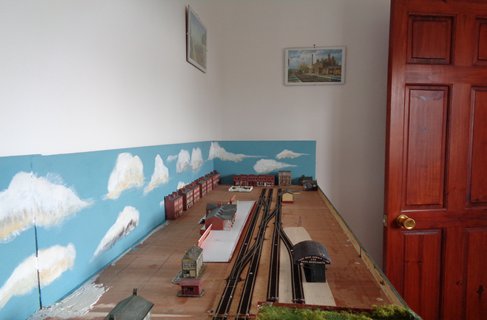
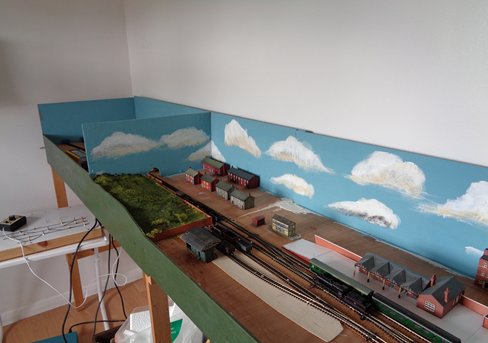
I have included some photos of a mock up of the general idea what the layout might end up but apart from the station that will be a fixed item. The scenery is a little fluid at the moment.
No rush and I am having fun which is the main thing.
Before I forget, I owe a big “Thanks” to Trevor, who kindly finished off the wiring and made the Control Panel & PSU for me. I must admit that is one part I do not enjoy.
BRAKE VAN TAIL LIGHTS by Chris
Like many of us, we have all liked the idea of having working tail lamps in our brake vans or end wagons or coaches.
Thankfully there are now many companies out there that provide small LED kits that fit into most N gauge rolling stock. And for these modellers with the ambition they can make them fit into even tinier spaces.
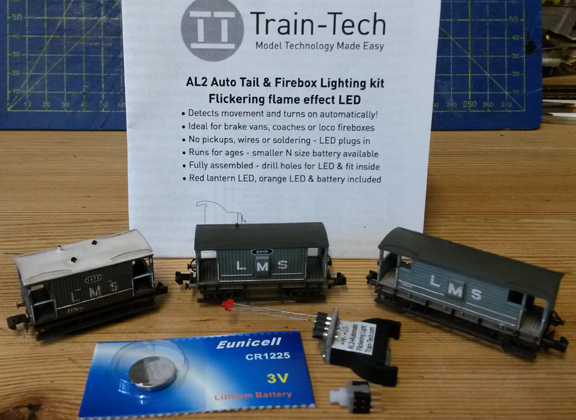
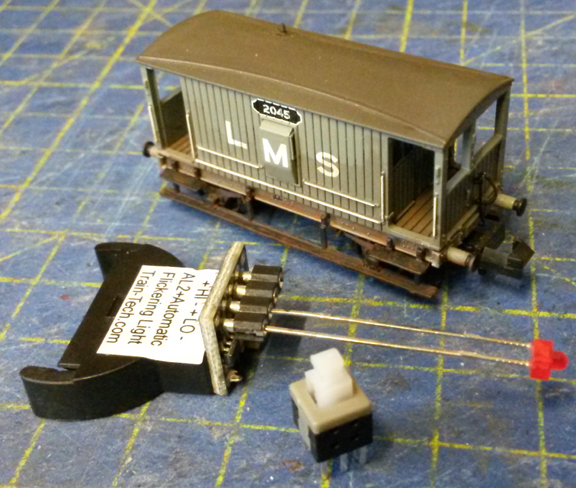
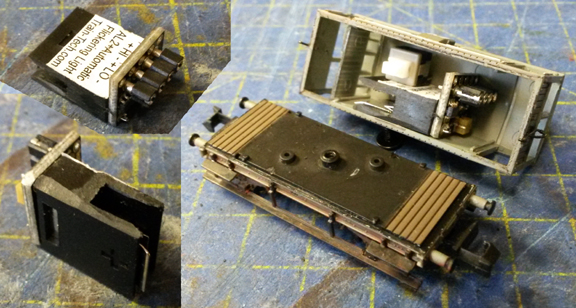
Well, last year at a show I had bought two kits from Train-Tech (www.Train-Tech.com), these being their ‘AL2 Auto Tail & Firebox Lighting Kit, Flickering flame effect LED’, complete with the small N size friendly battery (a 3V CR1225).
I like the kit and have decided to use the ‘low’ ports as they are giving off enough light to simulate the old style lamps I need for my LMS brake vans, but I’ve found that they had no off button on the units, so every time the unit senses movement the LED comes on.
This is no good if you are wasting battery life on time in transit to and from shows.
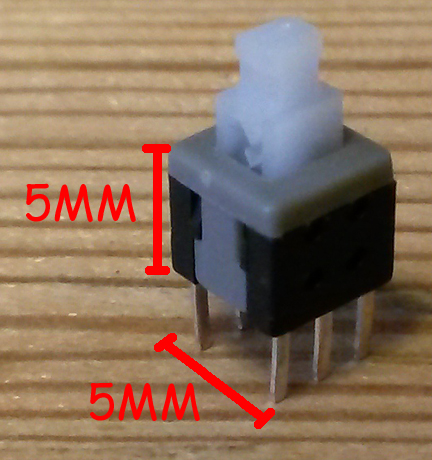
So, after looking around I managed to find some tiny click button on/off switches that are only 5mm square (not counting the pins on the back).
My plan is to place an interruption between the battery and one of the power tabs, then run wires from the other side of the interruption to the switch, drill a hole through the floor of the brake van and have the switch poke through so it is easy to turn it on or off on the days running.
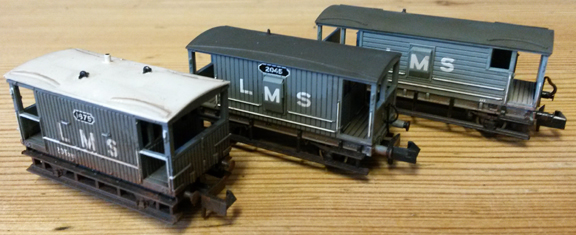
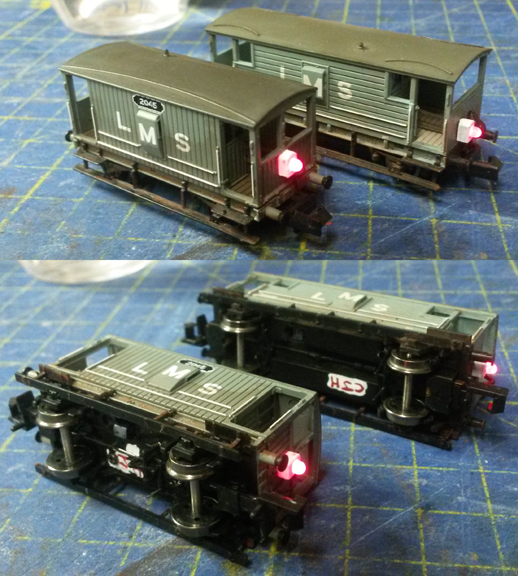
With some time on my hands recently I’ve finally gotten around to putting this plan into action and I have taken three of my brake vans out to see which are best to trial my idea.
I’m going to put the Peco brakes vans away for a bit as their inside space is looking a bit snug, but the Graham Farish brake vans seem the best option, if I can just find how they come apart without breaking them.
It wasn’t too hard to get it apart, just a pressure fit body and the chassis is held together with screws.
As per the instructions in the Train-Tech paperwork that comes with the kit, I have cut down the sides of the battery holder, as these are only needed on the larger battery.
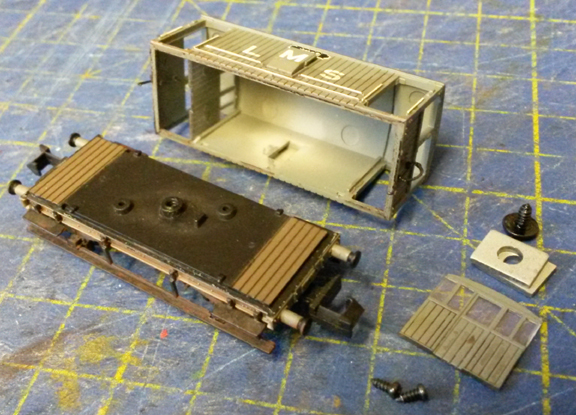
Taking out the weights from inside the body I can see that it’s going to be tight to fit the kit and the switch inside.
So, the next bits to go are any lumps and bumps on the chassis floor.
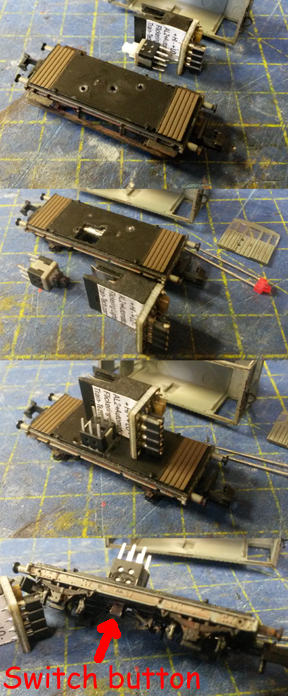
This means I have to file down the screws to shorten them so they no long poke up into the inside
I also had to move one screw to the other side of the chassis as it is right in the place where I’d like the click switch to poke down through.
The chassis is in two layers, so I am able to cut a large hole in the top layer for the shell of the switch to nestle into, and a small hole in the bottom layer for the button of the switch to poke out the bottom of the chassis.
Then after trying a test fit of all parts I currently have, I super-glued the switch in place with a few tiny drops on a needle; enough to hold the switch but not gum up its works.
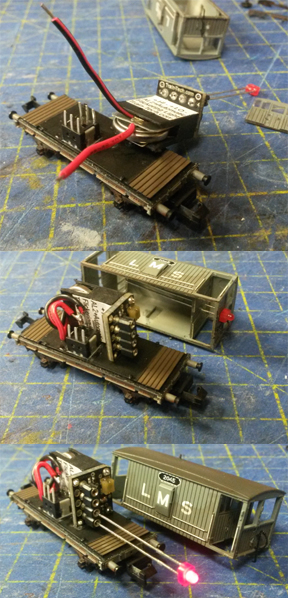
Next, I cut a piece of thin plastic (in this case some from the inlay of a Dapol box) and use it to interrupt the flow of power from the battery.
Then using two small lengths of wire I place them either side: one on the negative side of the battery and the other on the negative power pickup of the unit.
Both are only pressure fits as once they are inside the snug space they shouldn’t move, and the two other ends of the wires are soldered to the pins of the switch.
More test fittings and adjustments were required: I had to shave off more from the sides of the lamp unit and off the inside of the roof of the Brake van as there was still a 0.5mm gap around the base of the body and the chassis.
Once that was fixed another test fitting and all is well, then I was able to super-glue the unit in next to the switch.
Now the placement of the LED itself required some tiny accurate drilling of 1mm holes to allow the pins of the LED to reach back into the cab of the van and connect into the ports of the unit.
I was planning to bend the LED pins so that they travelled down under the floor and then come up into the cab and connect to the unit, but I soon found this to be a bad idea as the pins can fracture if bent as much as I’d like and it would be impossible to fit them in as the whole body and chassis has to be together before the LED is fitted.
So, I’ve gone for the simple fix of having the pins fit straight back into the cab and I’ll paint them a colour so their shininess is not seen.
Another test fitting and then I can trim and file the pins of the LED to fit perfectly on the end of the brake van and into the unit.
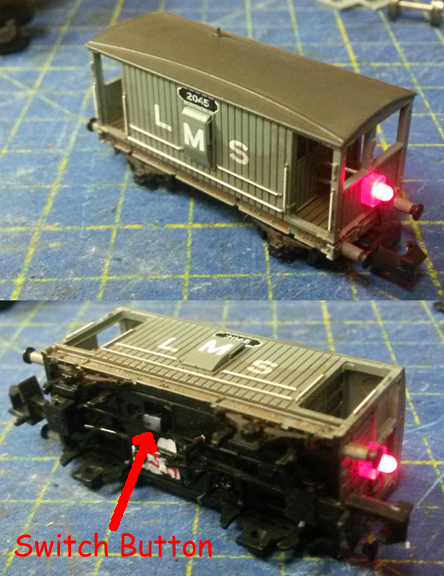
As you can see the shiny pins are visible still, and the button is easily accessible under the chassis.
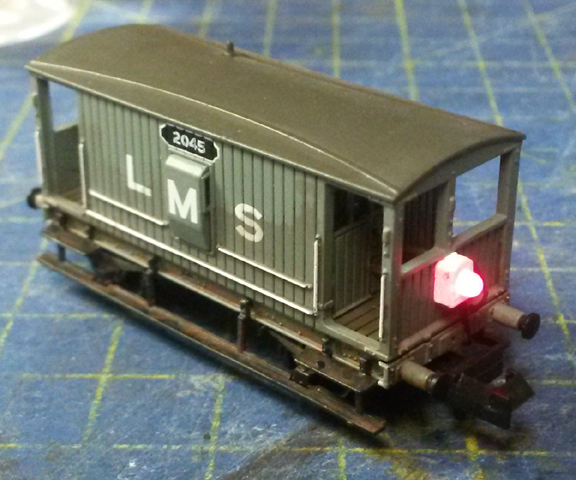
Then with all the parts refitted, some white paint around the LED and with some ‘track grime’ brown on the shiny pins the Brake van is complete and now has a nice lamp that can be turned on and off.
The plan went pretty well as I hoped, with only a few changes as problems appeared but it was an easy-ish conversion, so I have done the same with my larger Graham Farish brake van too.
I plan to buy more of these kits in the future and add them to my end coaches and see if I can fit them into my smaller Peco brake vans.
MILITARY VEHICLE KITS (yet again) by Trevor
Some further kits have been purchased / constructed.
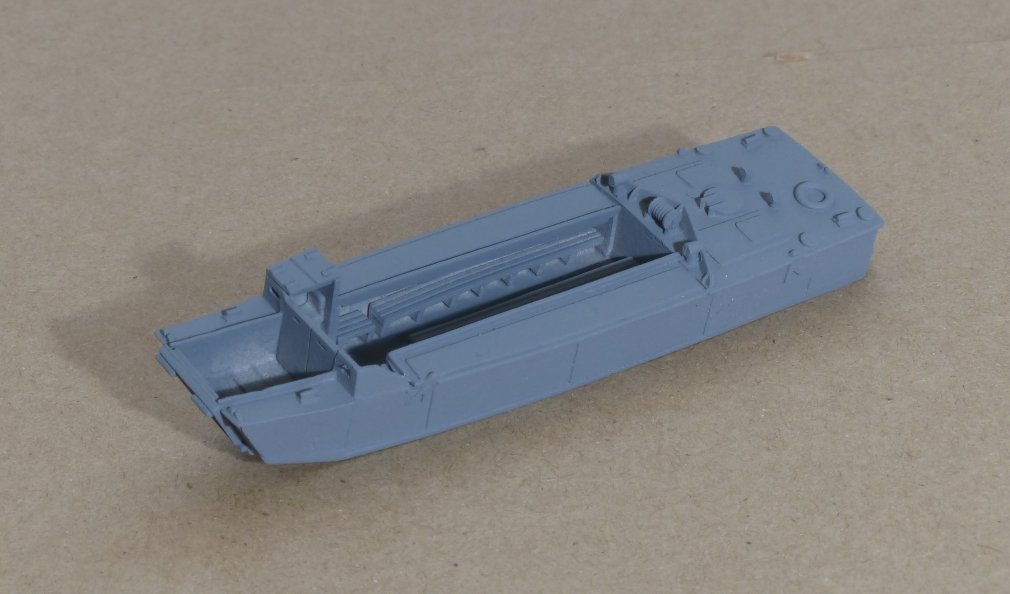
First up we have another type of landing craft. This is a British boat based on a Thorneycraft design.
Landing Craft Assault (LCAs) are another wooden based boat with some armour plating for limited protection.
Some 2000 were built in small boatyards and in furniture factories.
Just over 40ft long they were either carried on other vessels and loaded / lowered near to assault beaches.
These only carried troops (36) with benches along the side / middle and were not designed to carry vehicles / cargo.
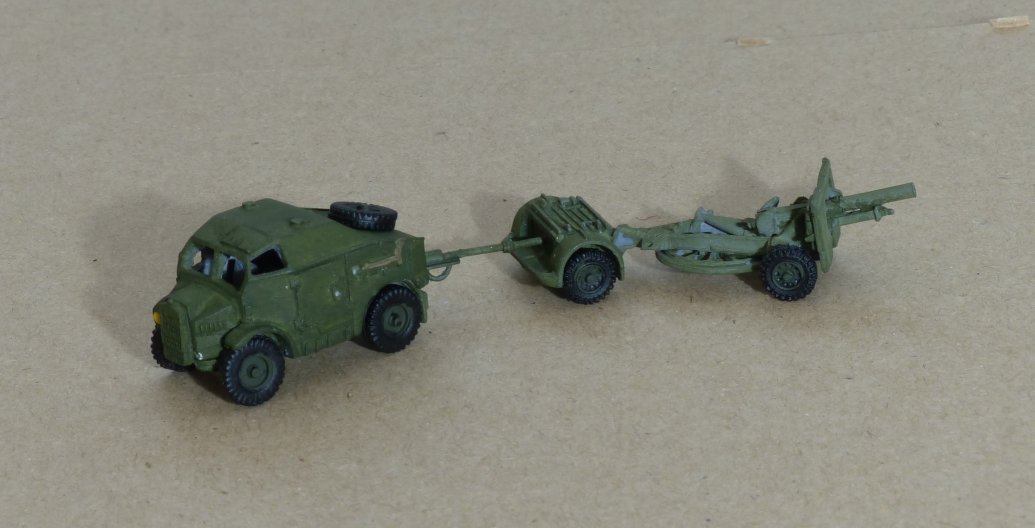
Next is a Ford gun tractor, limber and 25pounder field gun.
25 pounders were the main field gun in use during WWII and were a development of earlier horse artillery guns, hence the appearance that horses have been replaced by a truck.
This model has a Ford Tractor but other manufactures were also used including Morris and CMP.
The tractor is quite large and carries the full crew (6) + ammunition and other equipment.
Finally a Scammell Pioneer tank transporter.
These are very impressive vehicles with an amazing amount of suspension travel and off road ability.
In addition to tank transporter versions they were also used as heavy gun tractors and heavy breakdown recovery.
These are very large vehicles and with a Sherman load shown below were nearly 20ft high, which posed problems with clearance under bridges / overhead wires.
With a Sherman load the total weight would be close to 50T so the 8ltr diesel producing just 102BHP, would have been working hard.
The lack of driver aids we enjoy today would have made driving one of these a considerable physical challenge.

Still to be built are Bedford gun tractor and Bofors gun, Bedford signals truck, CMP water tanker and Austin ambulance.