Felixstowe Area “N” Gauge Group
MAY 2020 NEWSLETTER
MEMBER’S ROUNDUP
Kelvin - I would like to thank the members for their condolences, and messages on the sad loss of my wife Josephine. This includes the donations that have been sent which has nearly reached Ł700 thank you.
I know that some of you watched the service on line saying it was a moving ceremony.
There is a message I would like to give to the Wives and Partners of the members, a very big thank you for your support and patience, as I know Josie was for me.
DIARY & EXHIBITION UPDATE by Trevor
So, another month has passed and it increasingly looks as if mass events will not be possible for some considerable time.
Even if things are relaxed a bit its very likely some form of social distancing with limiting numbers / keeping separation will be in place and this would be very difficult to manage at model exhibitions.
I’ve seen some events in July / August now being cancelled. Last week the Sudbury club cancelled their exhibition in October. This was to be their 40th and the last they were holding at St Peters church. They have a planned move to a new venue for 2021, so their 40th will now be there.
IRMA are reviewing events for the rest of the year, but the feeling is they will all be cancelled / moved to 2021.
We have been discussing the situation for our Open Day in October, but unless there are significant changes it is unlikely, we will be able to hold this.
The only silver lining is that come next year, when hopefully we can resume, there should be plenty of new models to see.
LOCO WEATHERING by Chris
With time on my hands I have been testing my weathering skills on my wagons and coaches, but locos get dirty too.
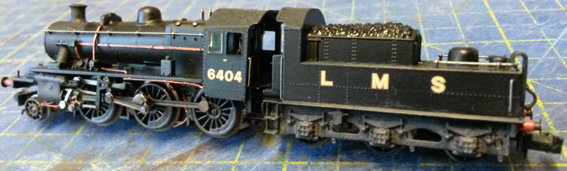
I’ve chosen to start with my Graham Farish Ivatt 2MT, LMS 2F 6404.
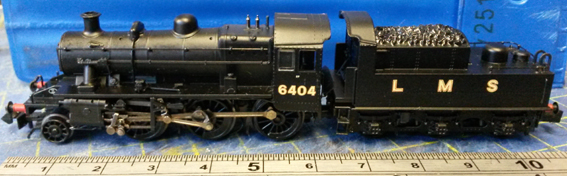
It’s a pretty loco with a lot of details that I thought would look good being picked out.
So, after digging through my acrylic paints I’ve used: matt black, dark silver, brass, copper, metallic white and custom mix of brown, grey and black to make a ‘track grime’ colour.
I am aiming for light traffic dirt, as though the loco is still in it’s prime and the crew keeps it washed down and rag polished, with just the grime of the day showing on the chassis and around some parts. So, there won’t be rust or leaking water stains.
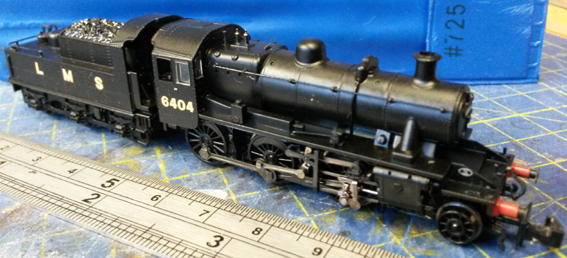
Using my smallest paint brush, an 0000, I painted two coats of copper on the tubes running either side of the boiler, below the footplate and under the pistons.
Next, I painted the handrails dark silver and the knobs brass, on both the side of the boiler and the back of the tender, and also some dark silver on the footrests of the ladder on the back of the tender and the cab steps.
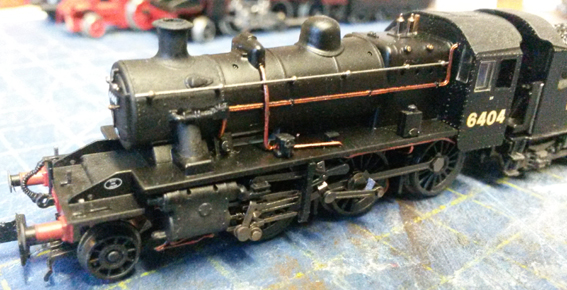
I’ve watched a few OO gauge weathering guides on Youtube, and a most that I’ve seen have used matt black powders to flatten the colour of the smoke box.
I don’t have a powder that is fine enough for this job in N gauge, but wanted to try a similar look.
So, I have a nice matt black paint which after two thin coats has worked to the effect I was hoping for; setting it off nicely next to the satin/gloss finish of the other parts of the footplate and boiler.
I extended the matt black down the steam pipes, the cab roofs on the loco and tender and on the plate below the smoke box door to show that the ash has left is dirty mark on the plate.

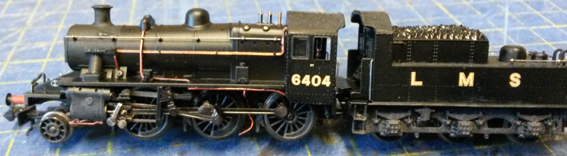
Last on the loco I decided to paint the details inside the cab: Copper for the pipes, brass for the handles, dark silver for the firebox plates and door, and metallic white for the cab’s gauges.
I think once I have a crew inside it will look perfect.

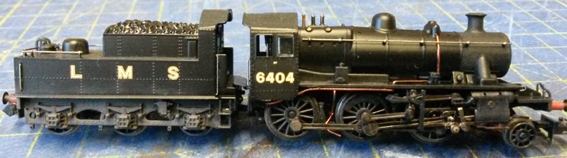
The tender was not forgotten, I used more matt black to show the fine coal dust sitting around the coal hopper/scuttle, then some dark silver on the lamp irons at the rear and on the buffers at both ends.
Finally, I dry brushed some of the track grime over both the loco and tender chassis, the buffer bars, on the wheels, the driving rods and around the pistons.
I’m happy with the finished result and will be adding these effects to most of the locos.
I like the track grime colour and I’m now thinking about how to weather my diesel fleet.
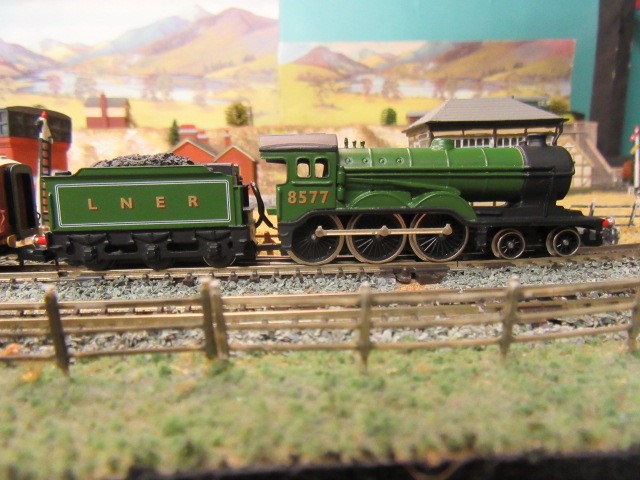
A BIRTHDAY WISH LEADS TO THE LIGHT by Phil
Early in April I was asked the usual question by my wife, “So, what do you want for your birthday?”
As usual I gave her a list of some books, a CD and of course ‘If I was deserving, perhaps she might like to phone that nice Mr Colin Heard in the Isle of Man and purchase a particular loco!’ and thought nothing of it.
My suspicions that something had arrived from Union Mills were confirmed a few days before my birthday, when a neighbour (a postman & railway modeller) asked across the fence, “Did you enjoy your new loco that was delivered this morning?"
I rapidly told him it was supposed to be a secret until Friday and hoped my wife had not heard.
I was now expected to receive either an LNER Green B12 or D11, which was odd as all my other stock is LMS.
Then Hatton’s N gauge news email arrived telling me, among other things, that they for just Ł71.00 I could have a three pack of Dapol Maunsell coaches.
Well it got me wondering if I could get some bargain LNER coaches?
So that is how I came to be purchasing 3 Dapol LNER Gresley Teaks for Ł68.00 inc. postage from Bure Valley Models.
They looked great on my layout, but then I noticed that they had pick-ups on the coach bogies and that’s how I came to purchase the light bars for the coaches!
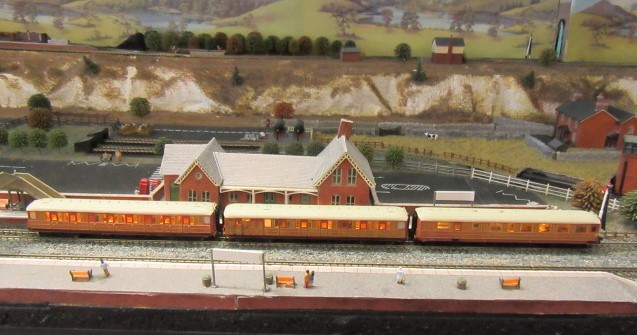
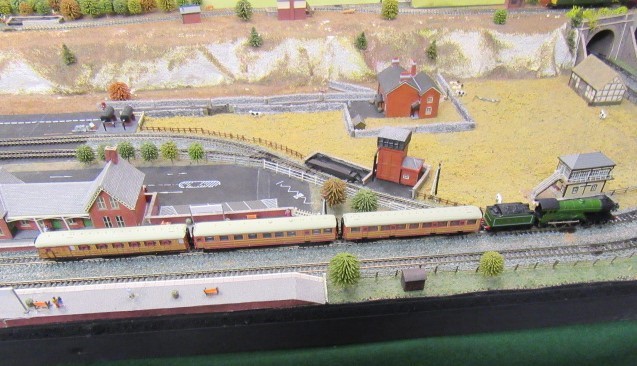
ALL DRESSED UP AND NOWHERE TO GO by Mike
I have been working hard for the last one and a half years, completely refurbishing and redesigning an exhibition layout, which I purchased and renamed “Weston”.
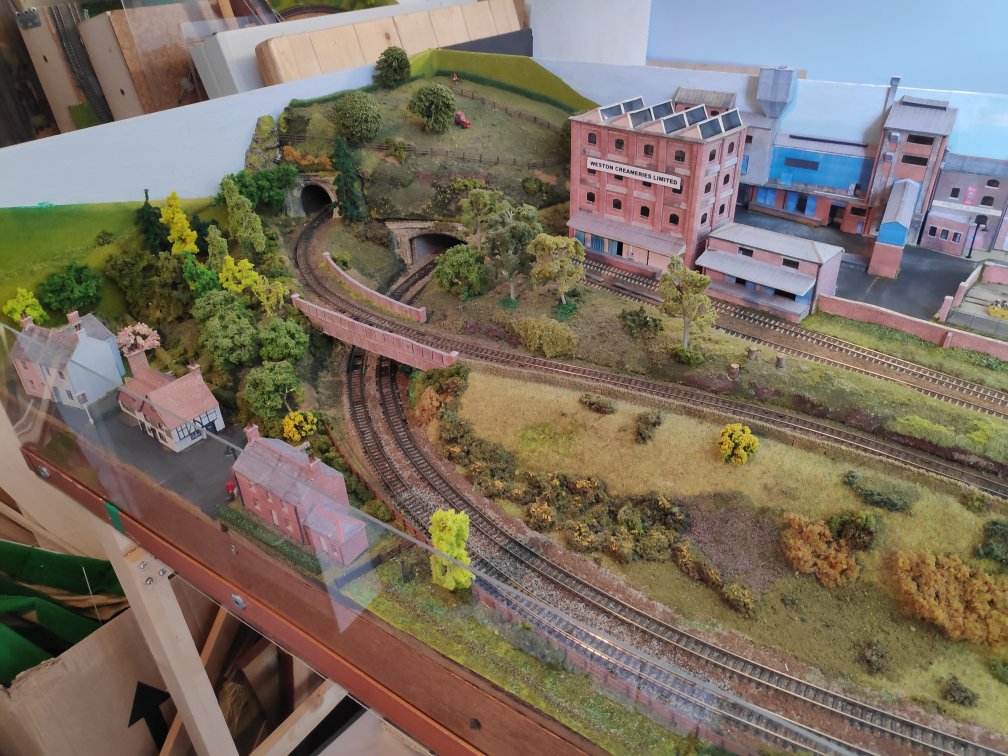
Every single building and structure has been replaced, or taken apart, recovered, and then reassembled.
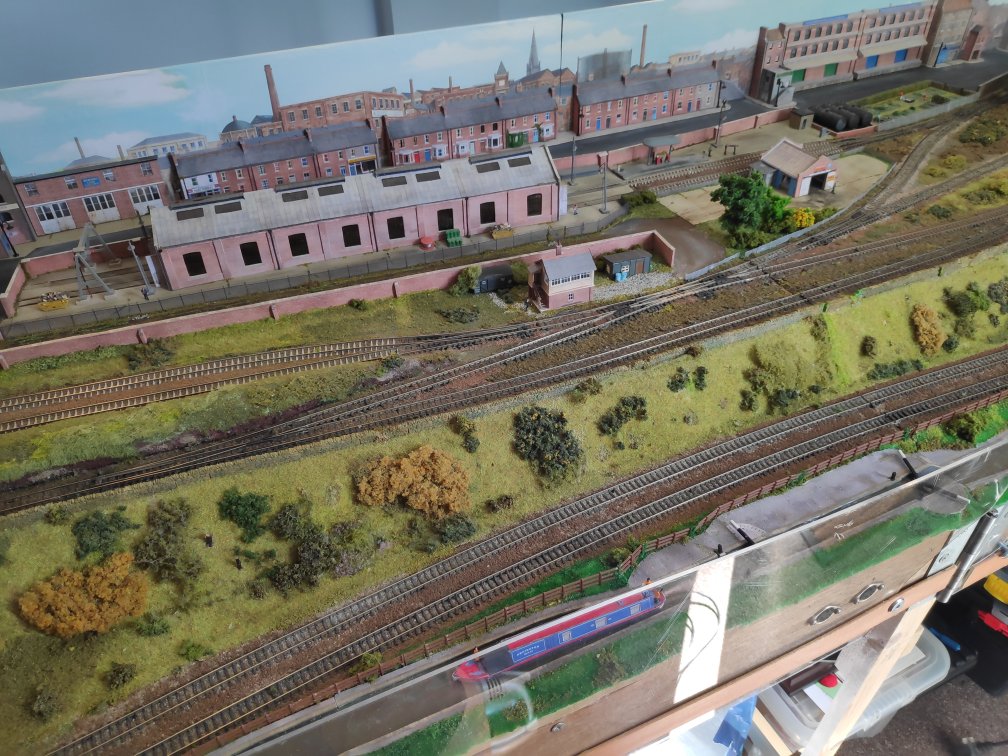
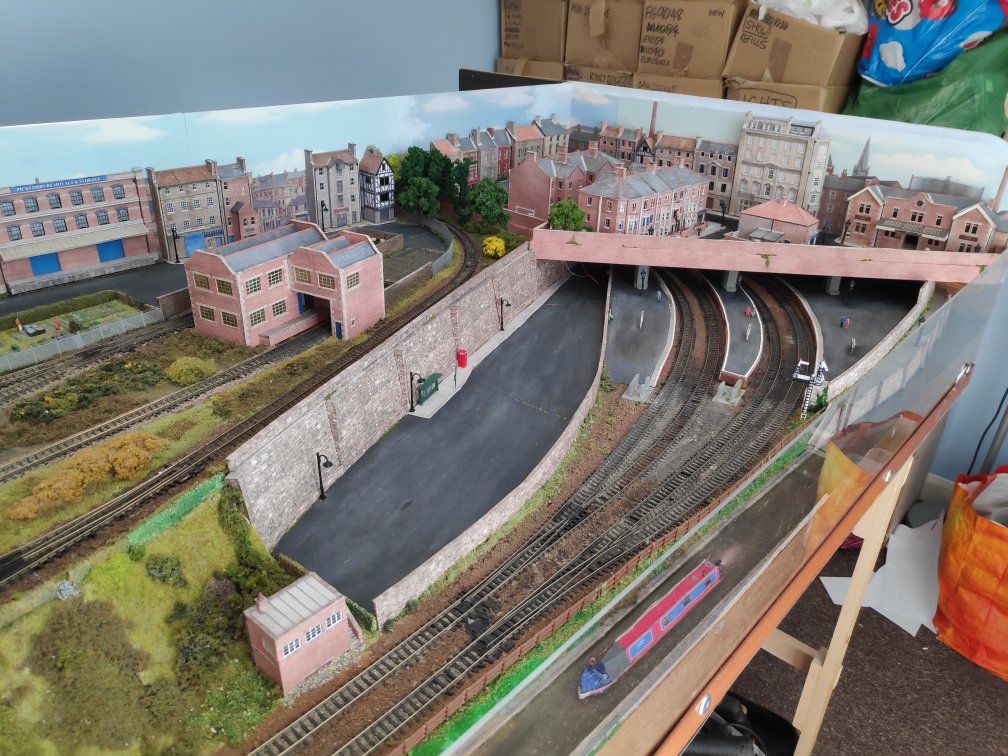
The rather strange road, which bowed out along the front and prevented transit cases being made to fit, has been removed and replaced with a canal.
Apart from a minor bit of electrics to do, and about a hundred white metal figures to paint, it is all now finished, ready for our June show as originally planned.
The only problem is…….
OLD – NEW LAYOUT Old (part 2) by Trevor
Last month I wrote about the history of the layout and how the design was developed for a competition in the IRMA club.
This time I’ll explain the operation of the layout and in particular, how the fiddle yards operate.
First an image shown last time to show the track layout;
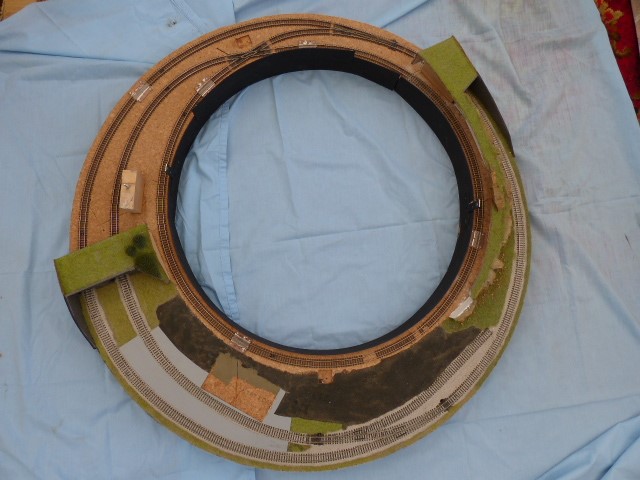
The outer circle of track comprises two fiddle yard sections (top left). Trains move from these in an anti-clockwise direction through the station (bottom) then around the scenic section back to the fiddle yard.
The inner circle of track comprises three fiddle yard sections. Trains move from these in a clockwise direction through the diamond crossing to the outer circle.
They head through the scenic section and upon reaching the station branch right then head back to the fiddle yard through the diamond crossing.
The following diagram helps show the various sections.
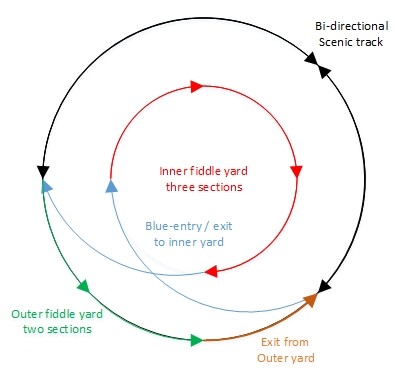
The outer bi-directional scenic section is under manual control for both the points and track power.
The inner and outer fiddle yards are under automatic control and the track in these sections is powered from a separate controller.
The inner and outer fiddle yards incorporate occupation detectors for each section (2x outer and 3x inner).
These control relays that feed power from the fiddle yard controller moving trains around the sections. The occupation detectors are positioned at the front of the sections.
The operation of the layout is easier to understand by considering the inner and outer circuits separately.
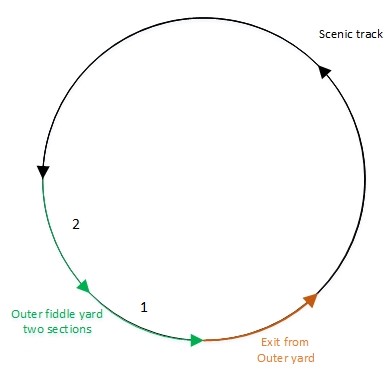
With two trains (train 1 & train 2) already stored on the two fiddle yard sections, the train 1 is moved from the yard using the manual controller (for scenic section).
A sprung switch must be held down and a diode ensures the train will only move if the direction switch is set correctly. Train 1 can then be moved round the layout and stopped / restarted in the station etc as normal.
Once train 1 has left section 1 of the fiddle yard the section 1 occupation detector recognises section 1 is clear and via a relay applies yard controller power to sections 1 & 2 allowing train 2 in this section to move forward leaving section 2 through to the front of section 1.
The section 1 occupation detector recognises when train 2 has reached the front of the section and deactivates the relay removing track power.
Once train 2 has cleared section 2 the section 2 occupation detector then applies yard controller power (via another relay) to section 2.
This is ready to receive train 1 currently on the scenic section.
Train 1 is driven round the layout (manual control) until it moves into section 2 where the yard controller takes over powering the train.
Train 1 then moves through section 2 until the section 2 occupation detector is activated when the relay it controls is switched off removing yard controller power.
Train 2 is now in section 1 and train 1 in section 2. Train 2 can then move round the layout, whist train 1 moves back to section 1. Thereby returning the trains to their original positions.
The inner circuit operates in a similar way but with an additional fiddle yard section.
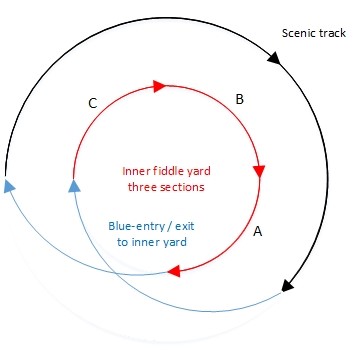
The manual controller (via another sprung switch) is used to move train A out through the diamond crossing onto the outer circuit. Again, a diode is used to ensure the controller is set in he correct direction. Train A is then driven round the layout and can be stopped at the station.
Once the section A occupation detector recognises section A is clear, it applies yard controller power to sections A and B (via a relay).
Train B moves forward from section B into section A. When train B reaches the occupation detector in section A power is removed.
Section B detector recognises section B is clear and applies yard power to sections B & C. Train C moves forward from section C to the front of section B where it is detected by the section B detector which removes yard power.
Section c detector recognises section C is clear and applies yard power ready to receive train A from the main circuit.
The sequence is repeated to move train B around the layout, then again to move train C.
Whilst this may seem rather complex its really a number of simple circuits repeated. The occupation detectors are Heathcote IR detectors (with delay).
The detectors may falsely detect the couplers between stock, which the delay prevents. The detectors simply switch relay(s) to apply power from the yard controller to the appropriate section of track.
So, the big question, how well does it work and is it reliable.
The design is not without issues;
When the layout is operated in an exhibition setup, access to the fiddle yards is limited. The outer via a lift off section and the inner by crawling under the layout and up through the centre hole.
Therefore, you do need locos that are reliable runners and guaranteed to start.
The controller used to power the fiddle yard sections has to be set at a suitable level to power all locos on the layout.
This means that ideally you need locos that all run at a similar speed.
If there is too much difference a slow loco might not reach the detector in the next section, before the following loco overshoots the section the slow loco has just left. This can result in two trains in the same section.
The power up of the layout needs to be done in a specific way without any stock initially.
Stock is then loaded onto manual section of the layout, then moved to the required fiddle yard.
This is a particular issue if power is switched off / back on whilst the layout is running fully stocked.
In practise there have been some issues at times with false triggering of the detectors. This appears to be associated with switching spikes from the relays.
E.g. a relay being switched on the outer yard, might trigger a detector on the inner yard.
Because the layout is very compact the detectors are close to the ends of the sections (to maximise train length) and these glitches sometimes cause a train to leave its section unexpectedly.
The detector position also means there is a risk a fast loco (particularly one with a flywheel), might overshoot the section.
I believe it should be possible to overcome these issues with improved spike suppression / power management and detector position.
To comply with the original competition rules the design is rather compromised in terms of the length of trains and fixed operating pattern.
However, the basic concept could be refined to improve these issues.
Some of you have helped me run my own layout Wilvey and may have spotted there are similarities with the fiddle yard I have on that layout.
It too has separate up / down fiddleyards with sequential queuing of trains, its own yard controller that takes over as locos enter the yard and diode protection for incorrect controller direction settings.
The main difference is that the calling on of trains through the sections is manual via switches.
However, the wiring is such that detectors / relays can be added in parallel to the existing switches, meaning it could be automated in the same way.
If I can prove the solution on the circular layout, I may implement it on Wilvey.
So, what will happen next to the layout? One possibility is the layout becomes a testbed to try and perfect the auto operation features.
Another option is to modify the control panel to have manual fiddleyard switches as a back up to the detector / relay solution (although it’s difficult to see where trains are in the sections).
Build another layout based on the same concept but slightly larger to allow longer trains and give more room for the station / scenic.
Finally develop a fully automated version (possibly using a Raspberry Pi).
At the moment I’m rather undecided.
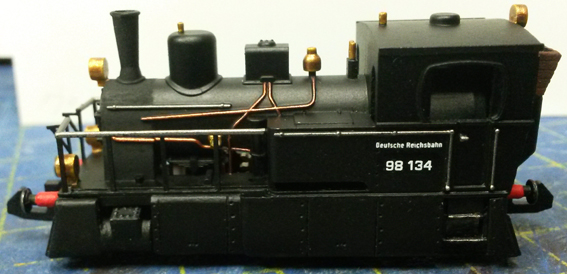
TANKING MY WAY DOWN THE TRACKS by Chris
The project started about a year ago, shortly after starting my Tramway layout, when I found a picture an old German metre gauge 2-6-0 tank engine with covered wheel sides.
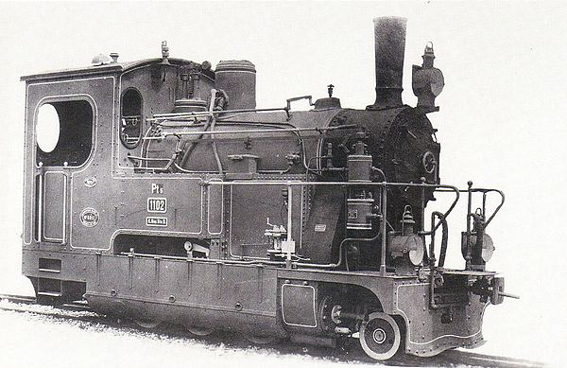
I had a loco in mind instantly for the project, as I had recent bought an Arnold 0-4-0 with missing drive rods on one side.
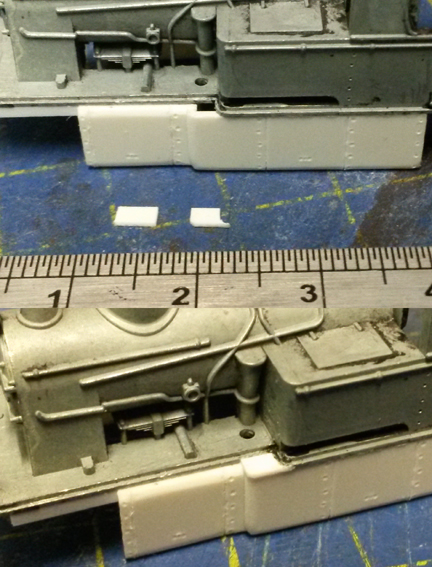
Checking the body, I could see that it overhung to chassis enough to allow for skirted/covered sides to be added without having too much conversion needed.
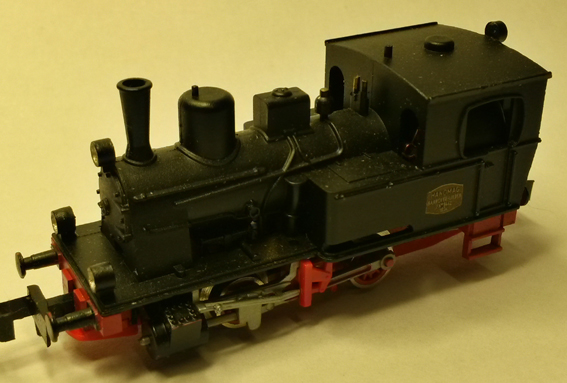
I used super glue to bond various plasticard pieces to the metal body, giving me a nice material to form all the parts I wanted for the conversion.
I used: 0.75mm sheet and 1mm bar for the side skirts, 0.75mm sheet and 0.5mm strip for the end ploughs, 0.75mm sheet and 0.5mm plank effect sheet for the extended coal bunker on the back, and lastly 0.5mm rod for the hand rails.

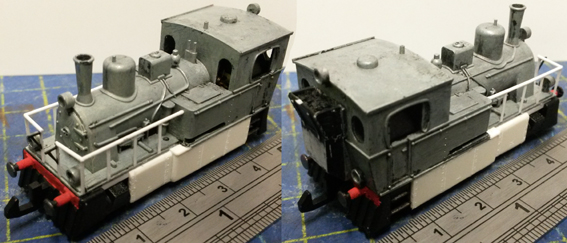
I’ve had it test running around on the tramway at a few shows and it looks and performs well as a tram-sided loco.
The model was then left for months in its box, but with this lockdown I’ve decided to get a few projects finished and this tram-loco is one of them.
So, I set about cleaning and breaking it down ready for painting, I didn’t want you dismantle the chassis to I just masked it up to spray the ends, while the body will get a full spray and re-livery.
DISASTER!
I should have checked, it’s all my own fault, but when I went to spray the body I hadn’t checked that my black spray was still good, and it wasn’t.
It had lost pressure and I think the paint was on the turn as it came out on the body shell like manky Hammerite, and I had no choice but to strip it all off.
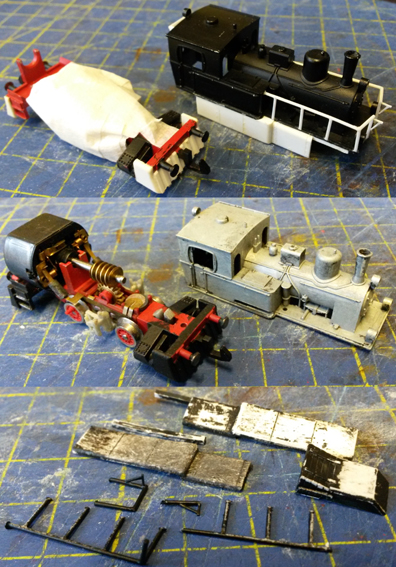
I tried to use a softer remover, white spirit, but it didn’t clean to well so I was forced to use the hard stuff, Nitromors, and as you can guess that ate through the plasticard like butter and I had to clean it all off, leaving me back at square one with the body.
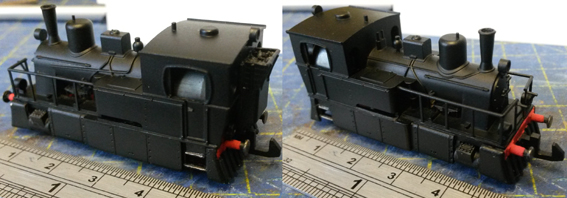
However my new can of black spray was still fine and the chassis came out perfect and I hand painted the red buffer beams.
There was one part of the plasti-card work I did save, and that was the extended coal bunker, which was nice as the angles were a pain to get right the first time.
So, with a striped body shell I had to start again with the sides, the same as before with the materials, I built up the side skirts, adding the details of: rivets, openable inspection panels and handles.
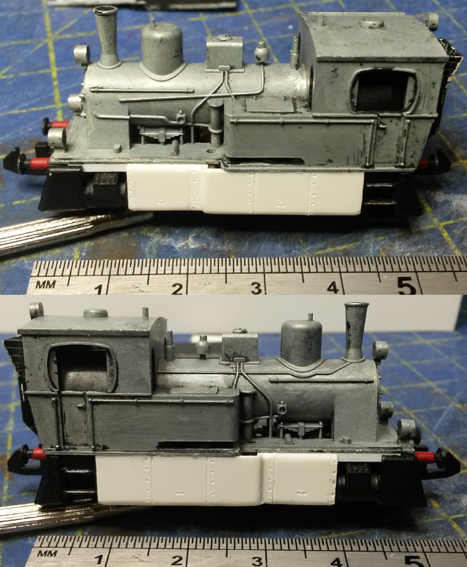
Then more fiddly parts such as the extended foot plates in front of the water tanks, these tiny bits were tricky to shape and glue into place, but they are needed to hide the holes where the side skirts form around some of the chassis parts.
Then to the handrails around the sides and front: I used the 0.5mm rod for the hand rails, but this time a changed to the 0.25mm strip for the upright supports.
Also, I tapped a divot into the front panels the water tanks to give the end of the plastic handrails something for the super glue to bond too.
Next a good base coat of black, and this time with no problems.
It’s a good satin black base colour I use a lot of as it suits matt or gloss varnish afterwards if you need it.
Finally, to finish it off is the detail paint and some decals.
I used a copper paint to highlight the pipe work on the boiler, a brass paint to colour the lanterns, whistles and safety valves, and a dark silver to paint the handrails and buffers.
I used a metallic white for the lights themselves, which give a nice reflective glow to the lights.
Plus, I even painted the external gauges on the sides of the boiler; a nice detail I didn’t know was there until I stripped the body.
Decal wise I have given the loco a German era2 number for its class and mark; 98 134, along with the DRG full name of Deutsche Reichsbahn.
So this is pretty accurate and should look good on the layout.
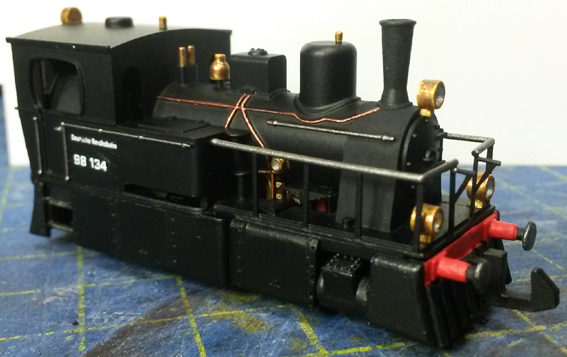
Overall, I’m really happy with how this finished up; it’s a tiny little 0-4-0 but is going to be a nice show piece on my tramway as it runs wagons in and out of the warehouse district.
MILITARY VEHICLE KITS by Trevor
In the December newsletter I wrote an article about my army module focusing on the rolling stock and vehicles.
At the time this was covering the Oxford Diecast models and some plastic kits. Since then I’ve been looking round for other suitable models / kits for the WWII period.
I’ve now found and purchased some resin cast and white metal kits.
The resin cast models are made by Brengun in Cech Republic, available in the UK from Hannants in Lowestoft.
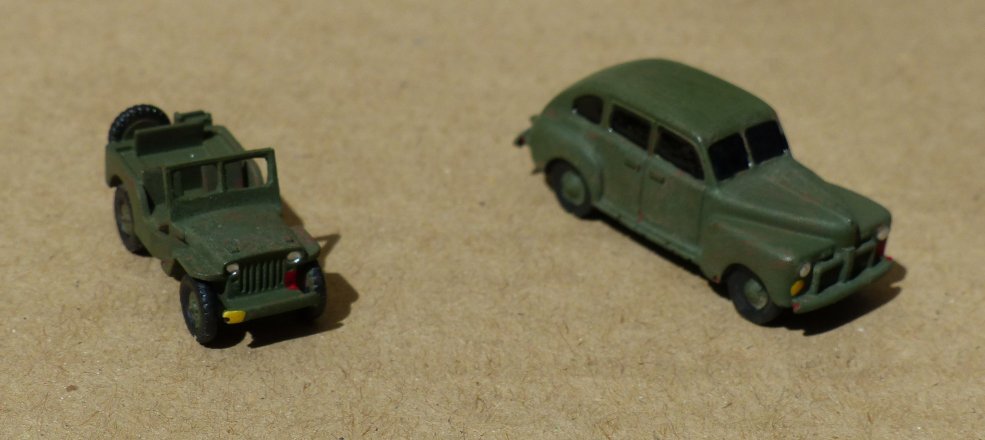
The only models suitable are a Willys Jeep and a staff car. These are 1:144 scale.
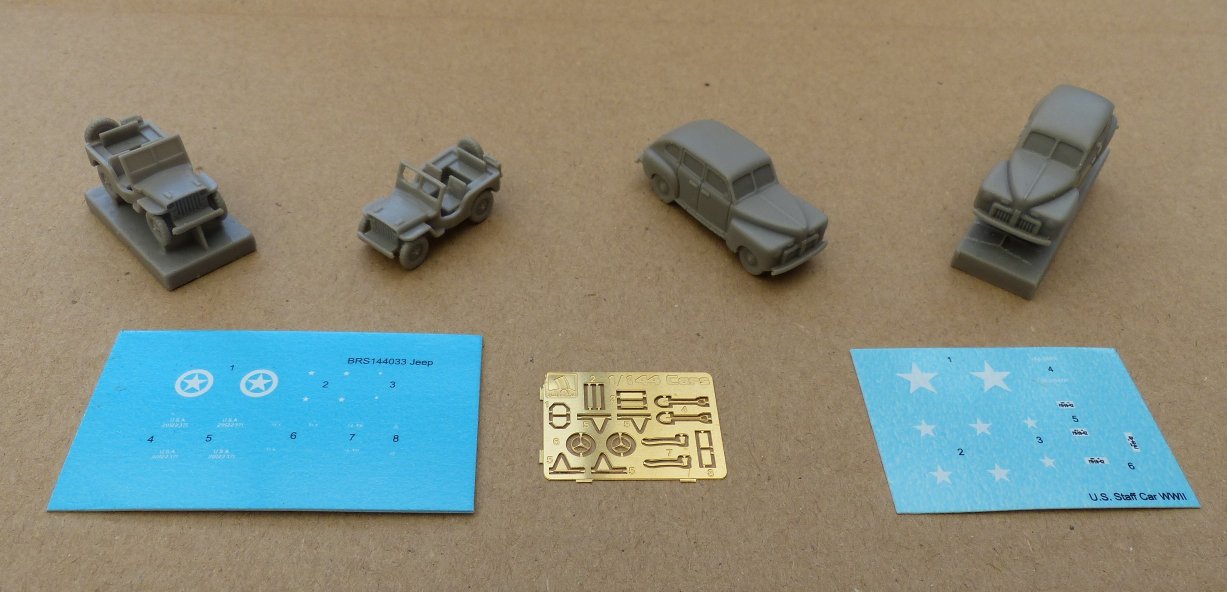
As you can see they are attached to a base (part of the casting process) which you have to carefully cut away. Being cast the car has solid windows but its possible to file out the windscreen on the jeep. The casts are very sharp and required no clean up / hole filling. They come with an etched detailing kit including pick / shovel, steering wheel and pennants, plus decals.
I’ve now painted up a jeep and car but I’ve yet to add the decals.
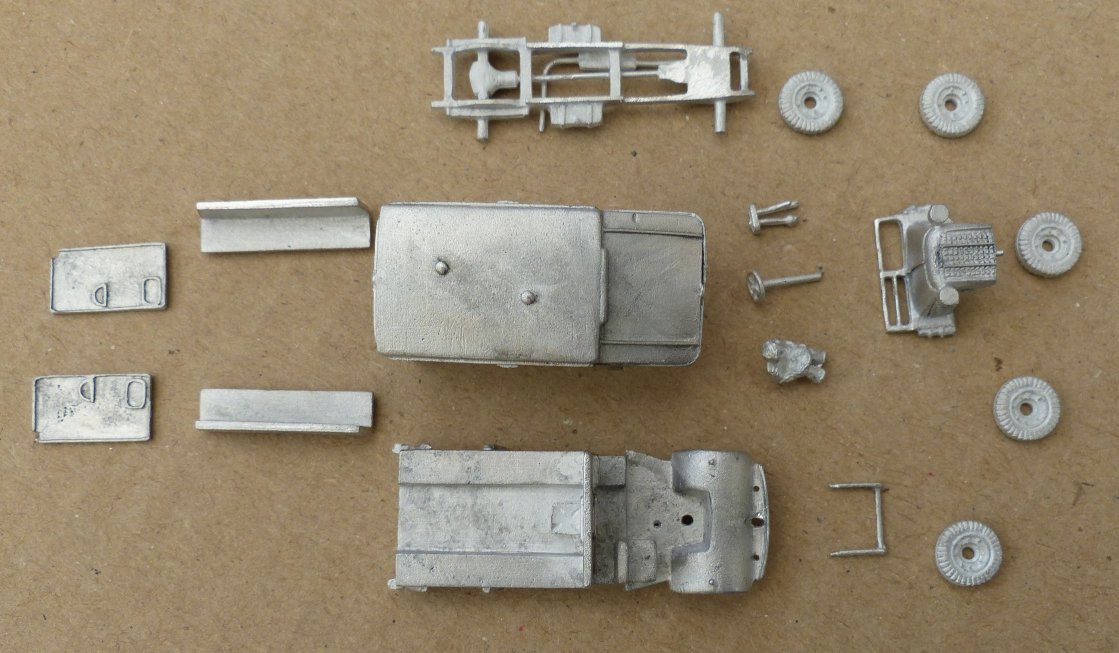
I’ve also found a small UK company, Arrowhead Miniatures. They produce a range of white metal military vehicles again in 1:144 scale.
They include models from WWI through to modern warfare. The WWII range is the largest section including armour, field guns, softskin / transport models and figures.
The website shows some images of built up models which looked good but as white metal kits can be very variable in quality, I purchased a small selection to see how good they actually are.
I’m pleased to say the castings are generally very good with little flash and decent detail.
The lorries have solid windows, but the ambulance has an open cab.
Being kits it would be easy to produce variations e.g lorries could be open backed or have tilt hoops but no cover etc.
Austin K2 ambulance

Field gun and crew
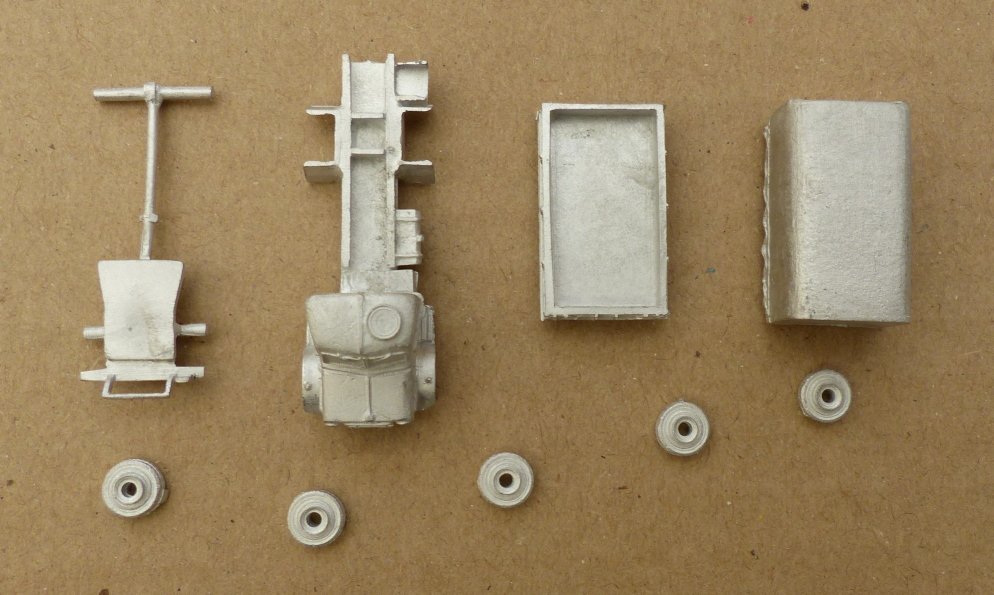
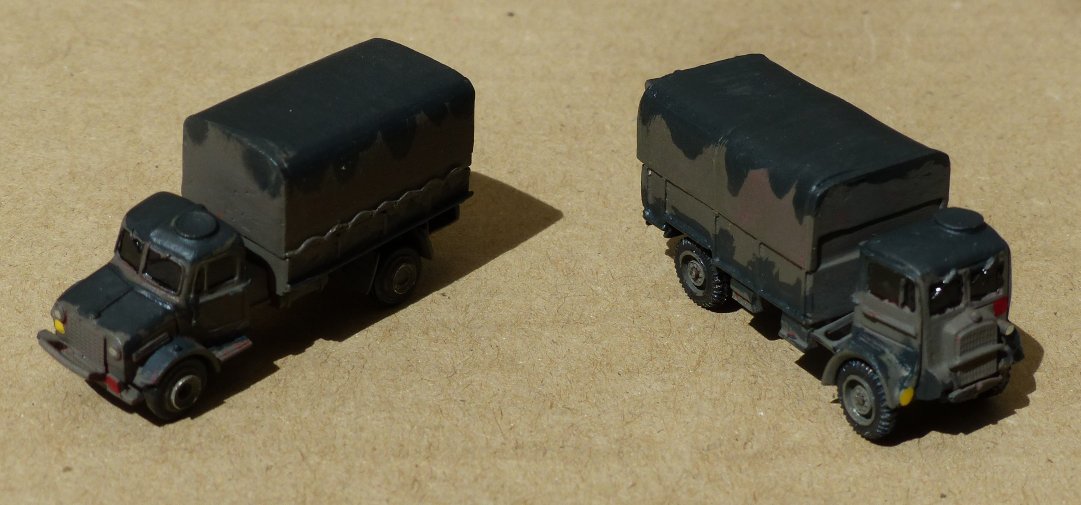
Bedford OYD lorry
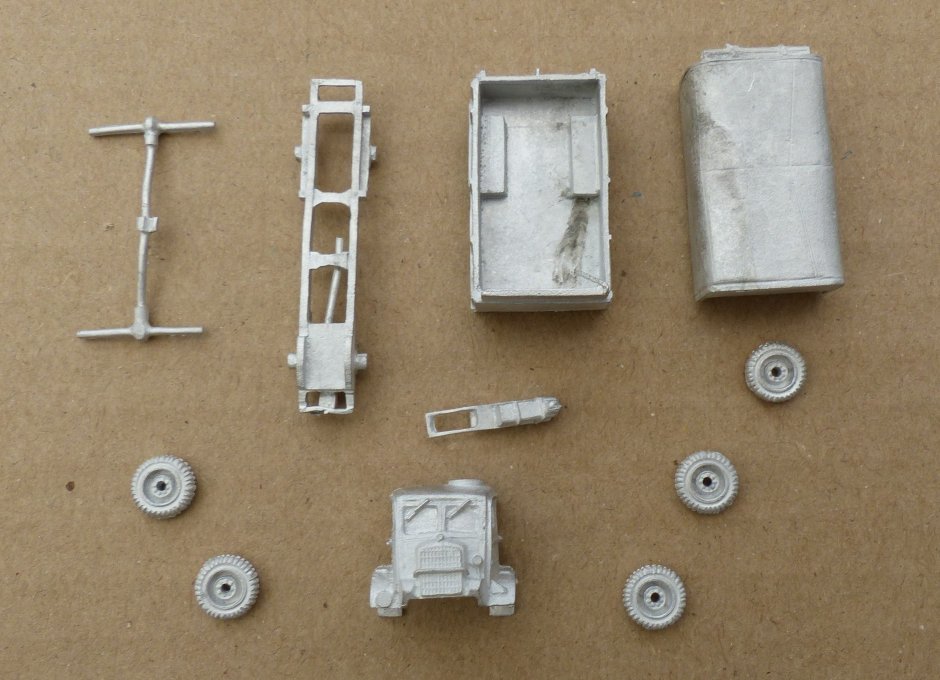
Bedford QLD lorry
I also have a Higgins landing craft, anti-tank gun, universal carrier, tank crews & tank riders.
So far I’ve built up and painted the Bedford lorries. I’ve assembled the guns but not yet painted.
One slight issue with the kits is lack of available decals, particularly the star markings used for D-Day.
If I can’t find a source making a printing block of a star might be a solution (I made one previously for some wagon side lettering).
Pleased with how these have turned out I’ve ordered some further kits of the lorries and guns, plus some gun tractor / limber / filed gun set.
Hopefully I’ll have some further models completed to show in later newsletters.
FIRST ATTEMPTS AT WEATHERING by Mike
I feel slightly embarrassed showing my efforts, after Chris and Trevor's excellent modelling!
I have begun to collect together engines and rolling stock in order to be able to run my layout in 1950 era, as well as the initial 1965 timescale.
Although steel mineral wagons had been introduced by then, I don’t believe that they were in extensive use, judging by many contemporary photos.
Most coal trains were made up renumbered private owner wagons.
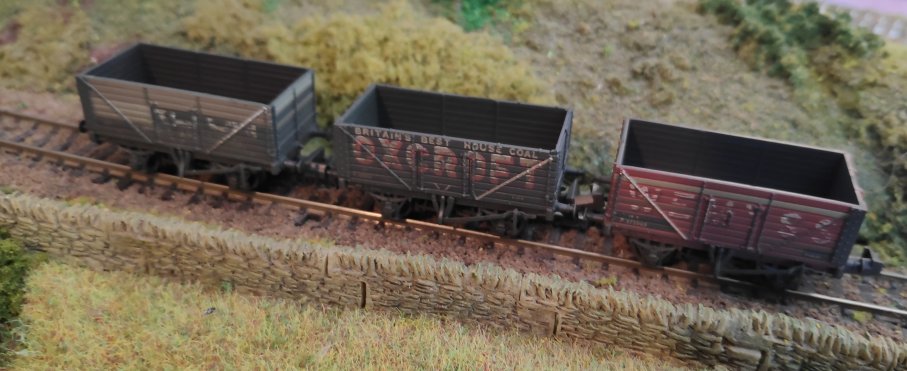
I have recently been fortunate enough to pick up the pack of three private wagons pictured above, reliveried with “P” numbers, very reasonably through Facebook.
With these as a guide, I set out to start building a lifelike period coal train, starting with a few cheap second hand wagons.
I rubbed the decals down with a fibreglass pen to “fade” them.
I’ve attempted to paint in some replacement planks, and weather the wagons overall.
I’m reasonably pleased with the results, although they look better “in the flesh” than in the photos!
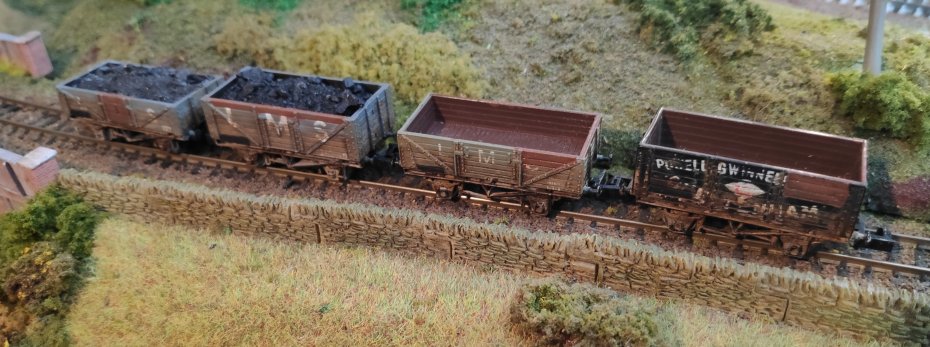
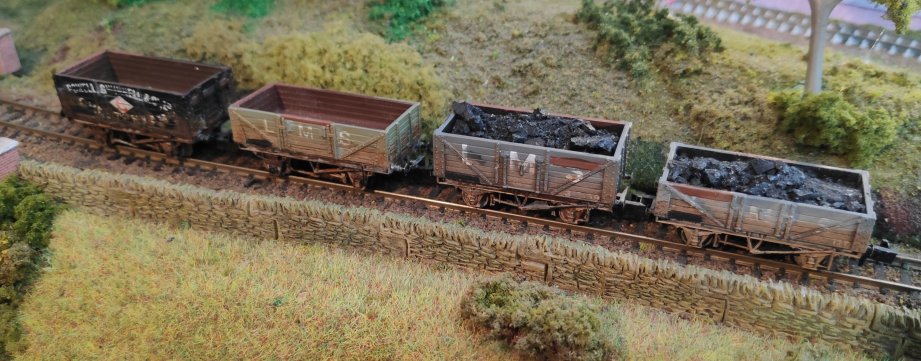
I’ve painted a black oblong on each, ready for the P number transfers, but then it occurred to me, would “big four” wagons be treated the same as private owner trucks and given a P number?
I really don’t know, so now I am stalled until somebody can advise me!
However, having now studied the photos above, I realise that the P numbers on the Farish wagons are so heavily plastered with muck that you can’t read them!
Maybe I should just put some vague white squiggles in the black boxes and then just weather over them?
WHAT TO DO WHEN YOU ARE IN LOCKDOWN! by t'other Mike
After making up a signal box from a Ratio kit I promised myself I would never again have a go at another Ratio kit as they are far too fiddly for ageing fingers and thumbs.
So, what did I do to pass the time shut in the house? Buy three more Ratio kits to keep me occupied!
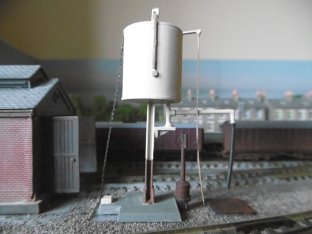
Here is a photo of the first one I have put together, a GWR water tower, best part of a week’s work there but I must say I am pleased with the result.
Now to number two, the goods shed, which I’m sure will take even longer!